

![[JavaScript] Understanding Event Capturing, Bubbling, Delegation](https://cdn.hashnode.com/res/hashnode/image/upload/v1697947146442/6e213b07-f155-4405-b6ac-83c7d11bf359.avif?w=1600&h=840&fit=crop&crop=entropy&auto=compress,format&format=webp)
Introduction
In this article, I will be talking about how the browser detects that there is an event.
The standard DOM Events describes 3 phases of event propagation:
Capturing phase - The event goes down from top to bottom
Target phase - reaches the target event
Bubbling - The event goes up from bottom to top

Event Bubbling
In the event bubbling, the event that occurred on the child element will also occur on its parent, then all the way up on the other parents.

For Example:
<form onclick="alert('FORM')">FORM Tag
    <div onclick="alert('DIV')">DIV Tag
        <p onclick="alert('P')">P Tag</p>
    </div>
</form>
Three elements are nested, so when you click on the <p> element, the event occurs, and the event handler will move up. So, now the event handler is on the <div>, then on the <form>.
We describe this situation as "event bubbling" because it has the characteristic of a bubble, which moves up until it reaches the top.
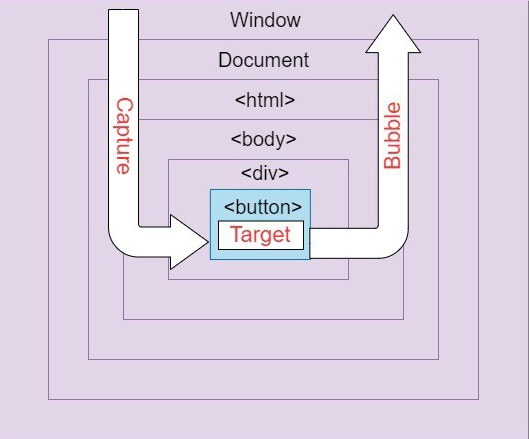
Let's have a look at this diagram.
The window object, which is at the very top, has the biggest size, then the document, then <html>, then <body> and so on. The child element is always the innermost and has the smallest size. So, the event bubbling is something that really makes sense because clicking on the <button> is the same as clicking on the <div>
Event Capturing
The event capturing is opposite to event bubbling. The event goes from top to bottom.

In order to check how capturing happens when an event occurs, you need to put an option in the third parameter of addEventListener() method.
The format is like this -> addEventListener(event, function(), capture: true) you can see the capture: true is added. This will allow you to see the flow of capturing.
For example:
<!DOCTYPE html>
<html lang="en">
  <head>
    <title>Document</title>
    <style>
      body * {
        margin: 10px;
        border: 1px solid red;
      }
    </style>
  </head>
  <body>
    <form>
      FORM
      <div>
        DIV
        <p>P</p>
      </div>
    </form>
    <script>
      for (let element of document.querySelectorAll("*")) {
        element.addEventListener("click", (e) => alert(`Capturing: ${elem.tagName}`), true);
        element.addEventListener("click", (e) => alert(`Bubbling: ${elem.tagName}`));
      }
    </script>
  </body>
</html>


e.stopPropagation()
The problem with bubbling is that the event on the parent or ancestor occurs when the event on the child occurs.
For example,

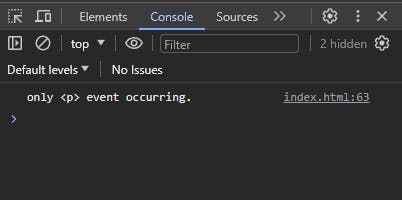
You only want the event on <div> element to happen, but then the event on <form> will happen as well. To prevent such a scenario, we can use the e.stopPropagation() method.
<!DOCTYPE html>
<html lang="en">

<head>
  <title>Event Bubbling</title>
  <style>
    body * {
      margin: 10px;
      border: 1px solid red;
    }
  </style>
</head>

<body>
  <form>FORM
    <div">DIV
      <p>P</p>
    </div>
  </form>
</body>
<script>
    const form = document.querySelector('form');
    const div = document.querySelector('div');
    const p = document.querySelector('p');

    form.addEventListener('click', function(e) {
        console.log("<form> onclick event")
    })

    div.addEventListener('click', function(e) {
        console.log("<div> onclick event")
    })

    p.addEventListener('click', function(e) {
        e.stopPropagation();
        console.log("only <p> event occurring.")
    })
</script>
</html>

Event Delegation
In the event delegation, the ancestor element controls the child element
In the previous example:
<form onclick="alert('FORM')">FORM Tag
    <div onclick="alert('DIV')">DIV Tag
        <p onclick="alert('P')">P Tag</p>
    </div>
</form>
We had to put onclick="" on every element to add an event listener.
Let's have a look at this example:
<!DOCTYPE html>
<html>
<head>
    <title>Event Delegation</title>
    <meta charset="UTF-8" />
</head>

<body>
    <div>
        <button class="buttonClass">Click me</button>
        <button class="buttonClass">Click me</button>
    </div>

    <script>
        const buttons = document.getElementsByClassName("buttonClass");
        for (const button of buttons) {
            button.addEventListener("click", () => alert('clicked'));
        }
    </script>
</body>
</html>
The <button> elements are controlling the event. Now, what if I want to add more buttons? Will the event occur?
<!DOCTYPE html>
<html>
<head>
    <title>Event Delegation</title>
    <meta charset="UTF-8" />
</head>

<body>
    <div id="buttons">
        <button class="buttonClass">Click me</button>
        <button class="buttonClass">Click me</button>
    </div>

    <script>
        const buttons = document.getElementsByClassName("buttonClass");
        for (const button of buttons) {
            button.addEventListener("click", () => alert('clicked'));
        }

        let newButton = document.createElement('button');
        let buttonList = document.querySelector('#buttons');
        newButton.innerText = "Click me";
        newButton.setAttribute('class', 'buttonClass');
        buttonList.appendChild(newButton);
    </script>
</body>
</html>

The third button (new one) is now added, but nothing happens when clicked. It is not working because the onclick events on the first and second buttons were added before creating the third button.
SOLUTION: Event delegation.
We can make the <div> control its child elements, which are <button> elements.
<!DOCTYPE html>
<html>
<head>
  <title>Event Delegation</title>
  <meta charset="UTF-8" />
</head>
<body>
  <div id="buttons">
    <button class="buttonClass">Click me</button>
    <button class="buttonClass">Click me</button>
  </div>

  <script>
    // changed part.
    const div = document.getElementById("buttons");
    div.addEventListener("click", () => alert('clicked'));

    // this part is not modified.
    let buttonList = document.querySelector('#buttons');
    let button = document.createElement('button');

    button.setAttribute('class', 'buttonClass');
    button.innerText = 'Click me';
    buttonList.appendChild(button);

  </script>
</body>
</html>